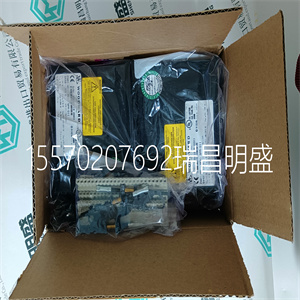

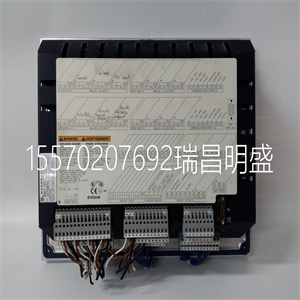

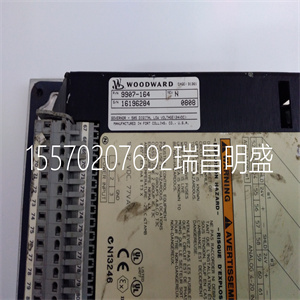


Woodward 5415-625
电力轨道安装指南
遵循以下指南以保持电源轨的可靠性:
•始终遵循电缆的安装说明
制造商
•在安装前,移除电缆上的扭曲、弯曲和扭结
将其安装在电缆托架中。
•至少在24小时前布置电缆非常重要
安装以缓解运输或运输过程中产生的任何应力
存储
•将电缆放入电缆托架时,托架
应平放,弯曲方向朝上
向上的然后,应在工作时安装电缆
位置电缆应铺设在电缆托架中,并
未编织在其他电缆之间或周围。
•电缆之间至少留出10%的间隙,以便:
自由移动。在电缆之间使用隔板。
•电缆必须在托架内自由移动。不要
将电缆连接到托架上或彼此连接。夹紧电缆
超出载体的端部。将载体循环几次
在夹紧之前。
•将较重的电缆夹紧在轨道边缘,并将较轻的电缆夹紧
电缆位于轨道中心。
•不要将电缆紧靠内/外轨道曲线。
隔板连接器组件
下图显示了隔板连接器的侧视图
通过螺钉连接,并通过法兰突出
导电壁(例如,金属柜)。前视图显示了
连接的隔板连接器的插脚突出穿过
墙
AB
概述
交配
导电的
(金属)墙
连接器
二次成型,
黑色pvc
B
预计起飞时间
C
18-1
我
A.
G
F
J
H
前视图和侧视图
17
出版物1326A-2.11-1998年5月
通过机柜壁安装隔板
为安装隔板连接器准备机柜壁:
1.定位机柜壁上安装隔板的区域
连接器。
2.标记四个安装孔和中心连接器的位置
开口将被定位。
3.钻四个安装孔和大中心开口。
4.刮去机柜壁内表面的任何油漆,其中
1326-CPB1-E-xxx、1326-CPB1T-E-xxx、1326-CPC1的隔板法兰-
E-xxx或1326-CPC1T-E-xxx电缆将进行接触。
注:所有B系列电缆连接器均采用黑色、高导电性的,
钴涂层。不要刮这个涂层。
重要提示:金属对金属连接需要符合CE要求
标准。
5.从1326 CCU EL xxx的接头表面拆下氟橡胶密封件,
1326-CPB1-EL-xxx和1326-CPC1-EL-xxx电缆,为以下电缆提供间隙:
橱柜的墙壁。机柜壁处的连接应为IP65。
6.通过墙壁连接隔板连接器,如图所示:
!
注意:为避免电击危险,请拆下
给电机控制器和电机供电
安装或拆卸电缆。如果不这样做,可能会导致
造成人身伤害。
AB
4.623毫米(0.182英寸)
大宽度
柜体壁
18
出版物1326A-2.11-1998年5月
双端隔板连接器
1326-xxx-D-xxx和1326-XXXX EE-xxx连接器具有:
一端为阳销,另一端为阴销。
连接舱壁和双端的指南
电缆
连接隔板和标准电缆的指南如下:
•标准连接器只能连接到隔板
连接器或460V-1326Ax电机。
•隔板连接器只能连接到标准连接器
连接器。
•将隔板连接到标准连接器时,一个
接头必须有阳插脚,另一个必须有
母销。
•尽管可以连接指定为L选项的电缆
对于没有此选项的电缆或电机,结果
连接将不具有L选项。
•电缆敷设长度不得超过90米。
安装直角连接器电缆
直角接头采用键连接,以确保方向正确。这个
以直角连接的1326根电缆的方向
与电机轴相关的接头如下所示:
AB
艾伦布拉德利律师事务所
标准舱壁
1326 xxx RA xxx和1326 xxx RAL xxx
电缆通向电机轴
Woodward 5415-625

Woodward 5415-625
Power Track Installation Guidelines Follow the guidelines below to maintain power track reliability: • Always follow installation instructions of the cable manufacturer. • Remove twists, bends and kinks from the cable before installing it in the cable carrier. • It is important to lay out the cabling at least 24 hours before installation to relax any stresses resulting from transit or storage. • When placing the cable into the cable carrier, the carrier should be laid out flat with the bending direction facing upward. It should then be fitted with the cables in working position. The cables should be laid into the cable carrier and not woven between or around other cables. • Allow at least 10% clearance between cables so that they are free to move. Use separators between cables. • The cables must be free to move within the carrier. Do not attach the cables to the carrier or to each other. Clamp cables beyond the ends of the carrier. Cycle the carrier several times before clamping. • Clamp heavier cables toward the edge of the track and lighter cables in the center of the track. • Do not pull cables tight against the inner/outer track curves. Bulkhead Connector Assembly The graphic below shows the side view of the bulkhead connector attached by screws and protruding though the flange and a conductive wall (e.g., metal cabinet). The front view shows the pins of the attached bulkhead connector protruding through the wall. AB Outline of the mating Conductive (metal) wall connector Overmold, black pvc B ED C 18-1 I A G F J H Front view Side view 17 Publication 1326A-2.11 - May 1998 Bulkhead Installation Through a Cabinet Wall To prepare a cabinet wall for mounting the bulkhead connector: 1. Locate the area of the cabinet wall where you will mount the bulkhead connector. 2. Mark the places where the four mounting holes and the center connector opening will be located. 3. Drill the four mounting holes and the large center opening. 4. Scrape any paint from the inside surface of the cabinet wall where the bulkhead flange of the 1326-CPB1-E-xxx, 1326-CPB1T-E-xxx, 1326-CPC1- E-xxx, or 1326-CPC1T-E-xxx cables will make contact. Note: All series B cable connectors are treated with a black, highly-conductive, cobalt coating. Do not scrape this coating. Important: A metal-to-metal connection is required to meet CE Compliance standards. 5. Remove the viton seal from the face of the connector for 1326-CCU-EL-xxx, 1326-CPB1-EL-xxx, and 1326-CPC1-EL-xxx cables to provide clearance for the cabinet wall. The connection at the cabinet wall will be IP65. 6. Attach the bulkhead connector through the wall, as shown: ! ATTENTION: To avoid a shock hazard, remove power to the motor controller and motor before installing or removing cables. Failure to do this can cause personal injury. AB 4.623 mm (0.182 in) Maximum width of cabinet wall 18 Publication 1326A-2.11 - May 1998 Double-Ended Bulkhead Connectors The 1326-xxx-D-xxx and the 1326-xxx-EE-xxx connectors have male pins on one end and female pins on the other end. Guidelines for Connecting Bulkhead and Double-Ended Cables The guidelines for connecting bulkhead and standard cables are: • A standard connector can only connect to a bulkhead connector or a 460V-1326Ax motor. • A bulkhead connector can only connect to a standard connector. • When connecting a bulkhead to a standard connector, one connector must have male pins and the other must have female pins. • Though cables designated with the L option can be connected to cables or motors without this option, the resulting connection will not have the L option. • The length of a cable run cannot exceed 90 meters. Installing Right-Angle Connector Cables Right-angle connectors are keyed for correct orientation. The orientation of the 1326 cables attached with right-angle connectors in relation to the motor shaft is shown below: AB AB ALLEN-BRADLEY Standard Bulkhead 1326-xxx-RA-xxx and 1326-xxx-RAL-xxx cables exit towards the motor shaft
Woodward 5415-625
Copyright ©2019-2022 瑞昌明盛自动化设备有限公司 版权所有 赣ICP备2021006016号


